Infosec Prep OSCP Vulnhub/Proving grounds CTF Lab walkthrough
Welcome to my blog! 😊
Hello, friend’s ,My name is Aj I am a cybersecurity analyst.
Today, we are working on solving the Infosec Prep OSCP Vulnhub/Proving grounds CTF Lab.
Infosec Prep OSCP
Infosec Prep VMs are free to download and use, and are ideal for anyone looking to improve their practical knowledge and skills in information security. They are also a great resource for those preparing for certifications such as OSCP, CEH, and others. Overall, Infosec Prep is an excellent tool for anyone who wants to enhance their penetration testing and ethical hacking abilities.
Each Infosec Prep VM is created with multiple security vulnerabilities and misconfigurations, which you can attempt to exploit and gain root access. The VMs are beginner-friendly, but also provide challenges for experienced professionals. They are a great way to test your skills and learn new techniques in a safe and legal environment.
In today's Infosec Prep OSCP lab, we will cover many new techniques and methodologies. In today's lab, we will cover the following points:
1. Port scanning and service detection using Nmap.
2. Website information gathering using Wappalyzer.
3. Directory brute-forcing using Dirb.
4. Base64 Encoder and decoder technology.
5. SSH public and private key concepts and logging in using public key.
6. We can escalate privileges using SUID.
7. Vulnerability Details of root sudi set on /usr/bin/bash
8. Search SUID exploits using the GTFOBins.
Step 1 :- Scanning
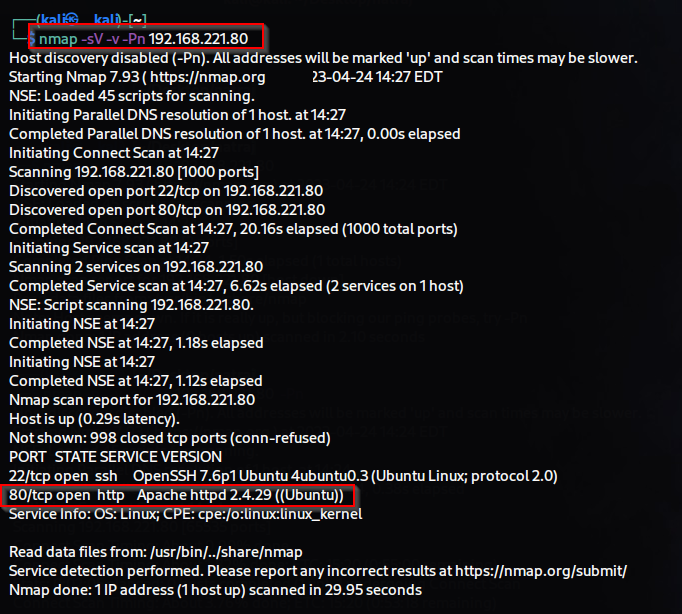
$ nmap -sV -v -T5 target-ip
nmap (Network Mapper Tool for Network scanning)
-sV (for service version detection)
-v ( for verbose output/displays more detailed information about scan)
-T5 ( for fastest timing template )
During the port scan, we noticed that a website is running on port 80. We opened the website in the browser and used Wappalyzer to gather information about it. We found that the website is built on WordPress, uses PHP language, and MySQL database, among other things.
Wappalyzer is a browser extension that uncovers the technologies used on websites. It detects content management systems, eCommerce platforms, web servers,
Step 2 :- Enumeration
As soon as I started the directory brute-force attack, I tested the website's "robots.txt" file, and it led me to discover a hidden folder named "secret.txt".
we opened the "secret.txt" file, we found encoded data.
Step 3 :- Gaining System Access
I copied the encoded data and used the CyberChef website to decode it. The output revealed an SSH public key.Then, I changed the permission of the "id_rsa.pub" file to 600. And finally, I used SSH to gain access to OSCP lab using my OSCP name initials.
After gaining access, I used the "id" command to check my user ID, and then I obtained a normal shell using "/bin/bash".
Next, I used the "whoami" command to check which user account I was logged in as. Once logged in, I used the "pwd" command to check my current working directory, "ls -al" to see the long list of all files in the directory, and "cat" command to view the "local.txt" flag.
$id
$/bin/bash
$whoami
$pwd
$ls -al
$cat local.txt
Step 4 :- Privilege escalation
SUID
Now, we will search for the suid binary that will grant us root permissions and examine whether any of them are vulnerable.
$ find / -perm -u=s -type f 2>/dev/null | grep "root"
find = ( use for searches in root directory and all subdirectories)
-perm = ( for permission)
-u=s = ( This option tells "find" to search for files with the "setuid" bit set. )
-type f = (use for search only for files )
2>/dev/null = (use for send error messages in null )
| = (use for sends it as input to the "grep" command.)
grep "root" =(This command searches for the word "root" in the output)
SUID bit on /usr/bin/bash owned by root
Vulnerability in details:- Setting the suid bit on /usr/bin/bash makes it run with
root privileges when executed by any user, effectively granting them
root access. This means that any user who can execute the bash
command could potentially gain elevated privileges and perform actions
that they should not be able to. This is a significant security
vulnerability because it allows an attacker to gain unauthorized access
to a system and perform malicious actions, such as modifying or deleting
sensitive data, installing malware, or creating new user accounts with
root privileges.
Gtfobins
We have found the /usr/bin/bash binary. Therefore, we will search for any existing exploits for this binary on Gtfobins.
/usr/bin/bash,
we searched on gtfobins for an exploit and were able to find one. We
then used the exploit to escalate our privileges to root, effectively
gaining full control over the system./usr/bin/bash)If you have any new ideas or if you find any errors, please feel free to email me at anytimehack2022@gmail.com.


Comments
Post a Comment